Querydsl 설정 방법
공식 문서에는 Gradle에 대한 내용이 누락되어 있으며, 실제로 QueryDSL 설정 방법은 Gradle 및 IntelliJ 버전에 따라 상이
(1) gradle.build
**// 1. queryDsl version 정보 추가**
buildscript {
    ext {
        **queryDslVersion = "5.0.0"**
    }
}

plugins {
    id 'org.springframework.boot' version '2.6.3'
    id 'io.spring.dependency-management' version '1.0.11.RELEASE'
    **// 2. querydsl plugins 추가
    id "com.ewerk.gradle.plugins.querydsl" version "1.0.10"**
    id 'java'
}

//...

dependencies {
    **// 3. querydsl library dependencies 추가
    implementation "com.querydsl:querydsl-jpa:${queryDslVersion}"
    implementation "com.querydsl:querydsl-apt:${queryDslVersion}"**
    //...
}

test {
    useJUnitPlatform()
}

**/*
 * queryDSL 설정 추가
 */
// querydsl에서 사용할 경로 설정
def querydslDir = "$buildDir/generated/querydsl"

// JPA 사용 여부와 사용할 경로를 설정
querydsl {
    jpa = true
    querydslSourcesDir = querydslDir
}

// build 시 사용할 sourceSet 추가
// IDE의 소스 폴더에 자동으로 넣어준다.
// 개발 환경에서 생성된 Q파일들을 사용할 수 있도록 generated 디렉토리를 sourceSet에 추가해주면 개발 코드에서 생성된 Q파일에 접근할 수 있습니다.
sourceSets {
    main.java.srcDir querydslDir
}

// querydsl 컴파일시 사용할 옵션 설정
// Q파일을 생성해준다.
compileQuerydsl{
    options.annotationProcessorPath = configurations.querydsl
}

// querydsl 이 compileClassPath 를 상속하도록 설정
// 컴파일이 될때 같이 수행
configurations {
    compileOnly {
        extendsFrom annotationProcessor
    }
    querydsl.extendsFrom compileClasspath
}**
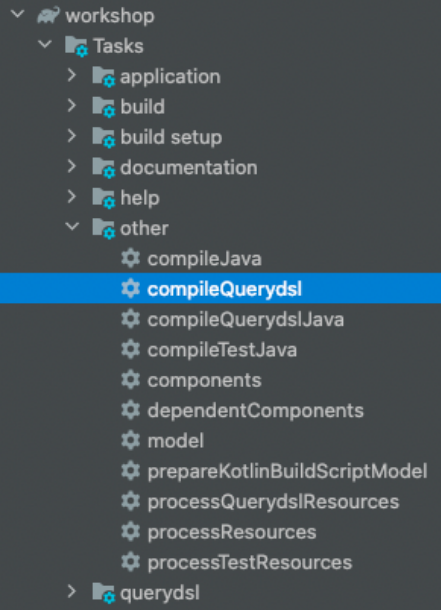
(2) compileQuerydsl 실행

Gradle Tasks -> compileQuerydsl 을 실행
또는 명령어를 이용하여 Querydsl query type 생성
./gradlew clean compileQuerydsl
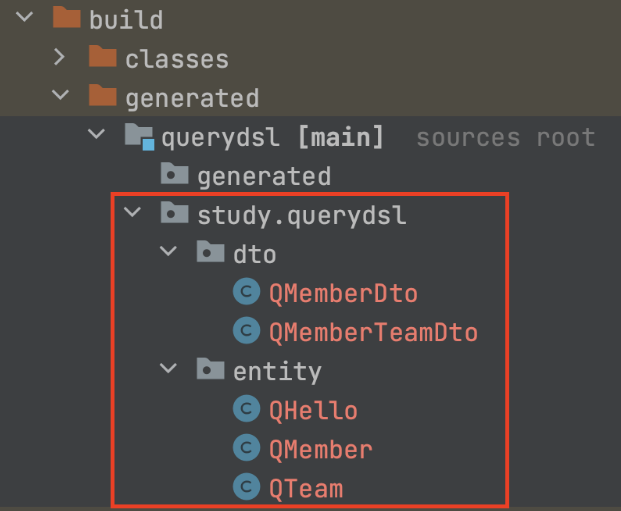
(3) Querydsl Build 결과 확인

- BUILD SUCCESSFUL 을 확인하였다면 build/generated/querydsl 경로에 Project Entity 들의 QClass 가 생성된 것을 확인할 수 있다.
- 프로젝트 하위 디렉토리 중 build/generated/querydsl 여기 진입하면 아까 생성한 Item Entity 가 QItem 으로 변해있는 것을 확인할 수 있습니다.
- $projectDir/build/generated 디렉토리 하위에 Entity로 등록한 클래스들이 Q라는 접두사가 붙은 형태로 생성되었습니다.
- 이러한 클래스들을 Q 클래스 혹은 Q(쿼리) 타입이라고 합니다.
- QueryDSL로 쿼리를 작성할 때, Q 클래스를 사용함으로써 쿼리를 Type-Safe하게 작성할 수 있습니다.
- git으로 소스 코드를 관리할 땐 반드시 해당 경로를 무시하도록 처리해주셔야 합니다.
- QItem.java 파일을 열어보면
package io.lcalmsky.querydsl.domain;

import static com.querydsl.core.types.PathMetadataFactory.*;

import com.querydsl.core.types.dsl.*;

import com.querydsl.core.types.PathMetadata;
import javax.annotation.Generated;
import com.querydsl.core.types.Path;

@Generated("com.querydsl.codegen.EntitySerializer")
public class QItem extends EntityPathBase<Item> {

    private static final long serialVersionUID = 1540314452L;

    public static final QItem item = new QItem("item");

    public final NumberPath<Long> id = createNumber("id", Long.class);

    public QItem(String variable) {
        super(Item.class, forVariable(variable));
    }

    public QItem(Path<? extends Item> path) {
        super(path.getType(), path.getMetadata());
    }

    public QItem(PathMetadata metadata) {
        super(Item.class, metadata);
    }
}
(4) Querydsl 정상 동작 테스트
그럼 Querydsl 을 이용해 정상적으로 쿼리를 수행하는지 확인해보겠습니다.
package io.lcalmsky.querydsl.domain;

import com.querydsl.jpa.impl.JPAQueryFactory;
import org.junit.jupiter.api.Test;
import org.springframework.beans.factory.annotation.Autowired;
import org.springframework.boot.test.context.SpringBootTest;

import javax.persistence.EntityManager;
import org.springframework.transaction.annotation.Transactional;;

import static org.junit.jupiter.api.Assertions.assertEquals;

@SpringBootTest
@Transactional
class ItemTest {
    @Autowired
    EntityManager entityManager;

    @Test
    void test() {
        // given
        Item item = new Item();
        entityManager.persist(item);

        // when
        JPAQueryFactory queryFactory = new JPAQueryFactory(entityManager); // (1)
        QItem qItem = new QItem("i"); // (2)
        Item found = queryFactory.selectFrom(qItem).fetchOne(); // (3)

        // then
        assertEquals(found, item); // (4)
    }
}

(1) JPAQueryFactory를 생성합니다. 이 때 생성자로 EntityManager를 주입해줍니다.
(2) QItem 객체를 생성합니다. 생성자에는 Entity의 alias로 사용할 변수명을 입력합니다.
(3) JPQL을 작성하듯이 자바 코드로 쿼리를 작성합니다.
(4) DB에 저장된 데이터와 다시 조회해 온 데이터가 동일한지 확인합니다.
잘 동작했는지 확인하기 위해 아래 설정을 추가해줍니다.
H2 데이터베이스 가 실행되며 테이블을 직접 생성하고 포매팅된 SQL 로그를 확인할 수 있기 위함입니다.
spring:
  jpa:
    hibernate:
      ddl-auto: create
    properties:
      hibernate:
        format_sql: true
logging:
  level:
    org.hibernate.SQL: debug
테스트를 실행시킨 결과는 다음과 같습니다.
2021-07-15 19:53:33.992 DEBUG 4334 --- [           main] org.hibernate.SQL                        :

    create table item (
       id bigint not null,
        primary key (id)
    )
// 생략
2021-07-15 19:53:35.898 DEBUG 4334 --- [           main] org.hibernate.SQL                        :
    insert
    into
        item
        (id)
    values
        (?)
2021-07-15 19:53:35.906 DEBUG 4334 --- [           main] org.hibernate.SQL                        :
    select
        item0_.id as id1_0_
    from
        item item0_
정상적으로 테이블을 생성한 뒤 하나의 데이터를 넣고 다시 조회해오는 쿼리가 모두 로그로 잘 출력되었습니다.
내부적으로 EntityManager를 이용해 쿼리하기 때문에 로깅 관련해서 추가로 설정해줄 필요가 없습니다.
아까 QItem 클래스를 유심히 본 분이라면 굳이 new를 사용하지 않아도 객체를 사용할 수 있다는 것을 눈치채셨을 텐데요, QItem.hello로 static final로 선언된 객체에 접근할 수 있습니다.
(5) 또 다른 예
[ Java 파일 구조 ]

[ 생성된 Q클래스 구조 ]

(6) p6spy 추가
sql문의 파라미터 출력 및 기타 기능들을 위해서 p6spy 라이브러리를 추가한다.
implementation 'com.github.gavlyukovskiy:p6spy-spring-boot-starter:1.5.8'